Showing posts with label CAS. Show all posts

Monday, November 14, 2016

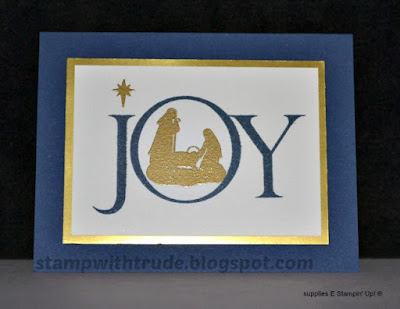
Joyful Nativity Christmas Card

This is one of the projects that we made during a September card class. 

The card is elegant, but simple to create. The stamp set is Joyful Nativity and it is a new set this year that you will find in the Annual Catalog.

Joyful Nativity, Stampin' Up!, Christmas card, Stamp with Trude, SU, CAS

Products I used:
Night of Navy cardstock
Gold Foil Sheets
Whisper White cardstock
Night of Navy Classic Stampin' ink
VersaMark ink
Gold embossing powder
Joyful Nativity stamp set

Joyful Nativity stamp set


Have a blessed day,
Trude

Tuesday, June 28, 2016

Balloon Clelebration Birthday Card

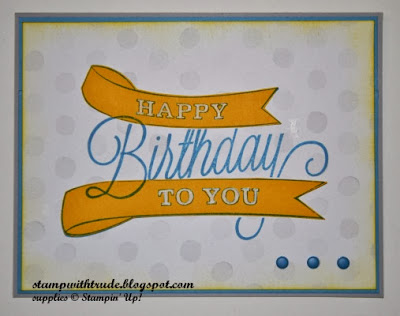
Do you need to make a quick card for a birthday? Here it is! This card used one stamp set and two colors of paper. 

Balloon Celebration, Stampin' Up!, Stamp with Trude, birthday card, CAS

Balloon Celebration stamp set
I stamped off each of the clouds one time before I stamped them on the cardstock. I didn't want them to overpower the balloons!

There's even a punch that matches the balloons so that you don't have to cut them out by hand! Love it!

Have a blessed day,
Trude

Wednesday, August 20, 2014

Something for Baby Card

Stampin' Up! Something for Baby baby card 

Stampin' Up! baby card, Something for baby stamp set, card created by Trude Thoman http://stampwithtrude.blogspot.com

This is a quick card. It should take under 10 minutes. Cut and fold a Whisper White card base. Adhere 4 1/4" x 5 1/2" chocolate chip card stock to the front. Cut a 3" x 5 1/2" Whisper White card stock piece and use an aqua painter to apply a stripe of Coastal Cabana ink (either use a drop of reinker or squish the lid on the ink pad and pick up the color from the inside of the lid).

Use the small grunge splatter stamp to stamp some splatter across the card. I think I may have stamped it off one time before stamping to decrease the intensity. Stamp the baby buggy with chocolate chip ink and the hello baby also.

Adhere to card front about 1/2" from top, there should be about 3/4" remaining at the bottom. Apply the Washi tape across the bottom and a strip above the buggy and you are done! Wasn't that easy?!

Thank you for joining me in my craft room today!
Happy Day, 
Trude

Wednesday, August 6, 2014

4th of 5 CASEd Stampin' Up! Cards


If you have a wedding to attend and need a quick card, this is the one for you! It just takes some designer series paper, whisper white card stock, baker's twine, two stamps, ink and embossing powder.
Very easy, you can do it in 10 minutes if you are organized!

http://stampwithtrude.blogspot.com Stampin' Up! wedding card by Trude Thoman Big News stamp set
First cut your Whisper white card stock to 5 1/2" x 11". Then cut a piece of Lullaby Designer Series paper 5" x 5".

Use either VersaMark watermark ink or Gold Metallic Encore ink to stamp the sentiment. Emboss with Gold embossing powder and a heat tool. Stamp the heart on the opposite side of the sticky area of a sticky note. Cut the heart out. Stamp and emboss the left heart with the same ink and powder previously used. Cover the cooled heart with the sticky note mask. Stamp the second heart to the right and emboss with the gold E.P.

Cut a strip of chevron paper, from the Lullaby Designer Series Paper pack, into a banner; adhere to top left of stamped piece; adhere to the front of the folded Whisper White card.

Tie Baker's twine into a bow; adhere to right side of banner with a glue dot. Stamp coordinating greeting inside card. Sign, Seal, and Deliver!

This is the 4th card that I redesigned from the Stampin' Up! spring occasions catalog. Please come back tomorrow to see the final card.

Thursday, July 31, 2014

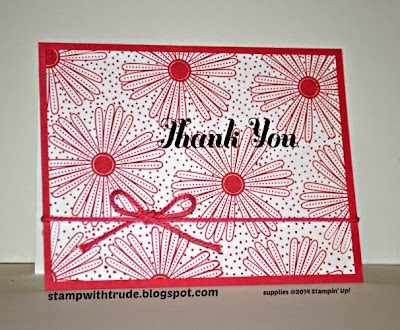
Mixed Bunch Thank You Card

I still have my pink paper out and my Mixed Bunch stamp set so I thought I would make a quick card. I know it doesn't look real quick because you have to do all the dots between the flowers with a Stamp-n-Write marker. So here's an idea...cut the white card stock (4" x 5 1/4") and stamp the flowers with Strawberry slush ink. Do half a dozen of them, the stamping goes real quick. Now, put them in a protective envelope and put them in your purse along with the Strawberry Slush Stamp-n-Write marker. Now when you are sitting and waiting for an appointment, or for you child to get out of whatever activity they are involved in, pull out the cards and start dotting away!

Many Thanks stamp set, Thank You card
It is easy to switch up the sentiment too. Just use a sentiment that is bold enough to stand on its own with the big pink flowers.

Here's the short list of products I used:
Paper- Whisper White card stock, Strawberry slush card stock
Ink- Strawberry Slush, Jet Black Stazon, Strawberry Slush Stamp-n-Write marker
Stamp Sets- Mixed Bunch, Many Thanks
Embellishments- Strawberry Slush Thick Baker's twine

I'm here for you if you are looking for a Stampin' Up! demonstrator. Let me know if I can help you.
Comments are appreciated, I'd love to hear from you.
Thanks for stopping by and have a wonderful day,
Trude

Wednesday, May 28, 2014

Pleasant Poppies Thank You Card

This card is for The Paper Players sketch challenge #197. It is a clean and simple sketch. I used Stampin' Up! Pleasant Poppies stamp set and kept it clean and simple (CAS).

Thank you card PP197
This is the sketch.

I used:
Paper- Polka Dot Parade DSP, Whisper White c.s., Old Olive c.s.
Ink- Old Olive, Rich Razzelberry, Jet Black Stazon
other- Artisan Label punch, Starburst Framelits, Prismacolor colored pencils, EK ribbon punch.

You can purchase these products at my 24/7 Stampin' store, just click on the item below.

Thanks for looking!
Trude


SSC76 Tea Party Card

Today's card is one that I created for Sunday Stamps Challenge 76 (SSC76). I used the Stampin' Up! Tea Party stamp set. I hadn't used the tea pot/flowers stamp yet so I thought I would use it for this card. I was inspired to color it with markers after I saw some samples on Pinterest. This stamp is fairly intricate and on the smaller side (about 2") so it is a little tricky to color. I had to get out my reading glasses to make sure the color was in the correct places!

Thank you card, thinking of you card, birthday card

Here's the Sunday Stamps sketch that I used for the card layout. It is a clean and simple layout (CAS).
I used:
Stamps- Tea Party, Itty Bitty Banners
Ink- Whisper White craft, Real Red marker, Old Olive marker, Smokey Slate marker
Paper- Basic White c.s., Cherry Cobbler c.s., Basic Black c.s., Modern Medley DSP
accessories- Bitty Banner framelits, Window framelits, EK ribbon punch


Sunday, May 25, 2014

Wetlands Father's Day Card FMS137

Now that the Memorial Day weekend is all but done, it is time to start thinking about the card/s that you will create for Father's Day. This one is a CAS (Clean and Simple). You can use it for the guy that likes things simple and clean...or maybe you want to create a card that is quick, this works for that too!

I used the Wetland stamp set (©Stampin' Up!). Have you tried using sandpaper in any of your creations? It's a guy thing, so it's perfect for this card. I used it for the strip of 'sand'. I think the sea birds and 'sand' would look good with torn edges too.

Masculine birthday, thank you, thinking of you, father's day

 I used the Freshly Made Sketch for this week
I will be sharing another Father's Day card tomorrow. Come back and check it out!

Monday, March 17, 2014

Easter Blessings Spring CAS

This is my CAS (Clean and Simple) Stampin' Up! card for the Paper Players CAS "spring" challenge. CAS can be hard to do. You don't want your card to look like you just pulled out a stamp and applied it to a piece of paper. But you do want it to be without too much fuss. This card has three basic elements; an embossed background adds interest and anchors the elements, a banner adds balance and interest to the left side, and the art piece is the focal point and final important element.

CAS, The Paper Players, spring, floral, Banner Greetings, birthday card, Blessed Easter, Stamp with Trude, Stampin' Up!


 Daffodils, Tulips and Crocus really say spring to me. So far I have seen patches of crocus and dots of daffodils, but I haven't seen tulips. They won't be far behind though!

Here is the list of supplies I used for this card:
Blessed Easter stamp set Wood #133212
Banner Greetings stamp set (hostess) Wood #129711 , Clear #129714
Basic White card stock #100730
Strawberry Slush card stock #131295
Water color paper #122595
Stazon jet black ink #101406
Strawberry Slush Classic Stampin' ink #131178
Pistachio Pudding Classic Stampin' ink #131177
Oval Collection framelits #129381
Pistachio Pudding Stretch Ruffle trim #130020


My 24/7 Stampin' Up! store

My Customer Appreciation Program

What's New

Have a Happy Day!
Trude

Thursday, March 13, 2014

Another Great Year Birthday Card

This card is a CAS (clean and simple) card. The Paper Players have a color challenge that works well for a masculine card. It doesn't have any pearls, rhinestones, ribbon, lace, flowers or pink on it. The stamp set is in the Stampin' Up! Occasions catalog. It is called Another Great Year. The moment I saw it I knew I wanted it to create bold masculine birthday cards. This is the first one I have created with the set.

The Paper Players, CAS, masculine, Another Great Year, birthday card, Stamp with Trude, Stampin' Up!

Tip:
To add contrast to the lettering on the banner I grabbed the White Stampin' Chalk Marker. It helps pop the words and the color adds continuity with the white on the background paper.

Supply list:
Smoky Slate card stock
Marina Mist card stock
Crushed Curry card stock
Watercolor Wonder Designer Series Paper
Another Great Year stamp set
Marina Mist Classic Stampin' ink
Crushed Curry Classic Stampin' ink
White Stampin' Chalk Marker
Subtles  Collection Candy Dots
Stampin' sponge

Thanks for visiting my blog today!
Trude

My 24/7 Stampin' Up! store


My Customer Appreciation Program

What's New

Tuesday, December 17, 2013

Be Very Merry Christmas Card

Here's a Christmas card that is quick for that last minute card making session. It only uses 2 stamps, the one on the outside and one on the inside. Since it is all Stampin' Up! products, you know it coordinates!
Be Very Merry, Christmas card, Stamp with Trude, Stampin' Up!, CAS, Mojo Monday
Supplies:
Basic White card stock
Pool Party card stock
Coastal Cabana card stock
Silver Glimmer Paper
Coastal Cabana Classic Stampin' Ink pad
Very Vintage Designer Buttons
Decorative Label punch
1 1/4" circle punch
Pool Party Seam Binding
Festive Flurry Framelits
Stampin' ink dauber
Winter Frost Designer Series Paper

I used a Mojo Monday Sketch for this card.
Enjoy!
Trude

Sunday, December 15, 2013

Starburst Sayings Birthday Card

Do you have all your Christmas cards made? Here's a Birthday card that uses some products from the upcoming Stampin' Up! Occasions catalog. The products will be available January 2nd.

Starburst Sayings, birthday card, Stamp with Trude, Stampin' Up!, masculine card
This is one of those CAS cards. It is Clean And Simple.It should take less than 10 minutes to create. This card would work for young, old, feminine or masculine. So it is a good general birthday card to have ready to go in your card box.

I used some silver Dazzling Details on the word "Happy", but it doesn't really show up in the photo.

Here's the list of supplies:

Whisper White card stock
Real Red card stock
Fresh Prints Designer Series Paper Stack (available 1/2/14)
Bermuda Bay Classic Stampin' ink
Soft Suede Classic Stampin' ink
Circle Framelits
Starburst Sayings Stamp set (available 1/2/14)
Starburst Framelits die set (available 1/2/14)
Chalk Talk Framelits die set
Remembering Your Birthday stamp set
Silver Dazzling Details

Monday, July 23, 2012

Birds and Roses Greeting Card

click on photo to view details

The card base is by Paper Pizazz and the stamp is a retired Stampin' Up! stamp. It makes a sweet note card and a clean and simple card.

Look at the current stamps that Stampin' Up! offers at my 24/7 Stampin' Up! store

And if you are looking for a demonstrator, I would be happy to help you!!

Sunday, July 22, 2012

Bright and Fun Crocodile Card

click on photo to view details
This is a quick card, especially if you use a base card from a package of cards that you buy all ready to be embellished like I did here. Then I wrapped a bright ribbon around the card base, stamped a crocodile and accompanying sentiment. Layered it on paper printed with bright color swatches and adhered it to the card. It could say, "Thinking of You", or "Happy Birthday" inside the card. I put a wiggle eye on it for added fun. Another Clean and Simple (CAS) card!

Tuesday, July 17, 2012

Simply Sweet Notecard

click on photo to view details
This card is simple but sweet. I cut an inch off the front and added a red border that I had cut with scallop scissors. I tied a ribbon over the seam and stamped and matted a floral image and mounted it to the front of the card.

Friday, July 13, 2012

Today's Quick card

click on photo to see more detail
The card base is from Hot Off the Press, but I don't know what other companies the stamps, paper and ribbon are from.

The WISH stamp may be a Fiskar's stamp.

Tuesday, July 10, 2012

Spring Card

Quick and easy spring card. I adhered print paper to the front of a card that I cut an inch off the front ONLY. I adhered a strip of coordinating paper to the bottom of the striped paper and used decorative scissors to trim the edge of the card back. Then I stamped the butterfly and the sentiment.
The spring colors add cheer on a gray blustery northwest spring day!

Tuesday, June 26, 2012

Simple Thank You Card

click to see details (smudge, LOL)
This does not have to be a Christmas Thank you card. I just happened to make it after Christmas for the purpose of sending a Thank you for Christmas presents. It could be made with floral paper or birthday paper or wedding paper. It is quick and easy, which is a plus for any type of occasion that requires more than one of two thank yous to be sent. Just choose three coordinating papers and a coordinating ribbon. I used 2 prints and one solid, plus the neutral color to stamp the sentiment on. This was a class card sample.

Thursday, June 21, 2012

Moonlit Scene Greeting Card

click on photo to see details

I like how this card turned out. It is a one stamp wonder. I just stamped it onto the blue with black ink then colored the moon and moonbeams on the water with white and yellow colored pencils.

Thanks for looking, see you next time!

Trude

Monday, June 11, 2012

Quick Valentine

I used a card that was pre-embossed with hearts. I ran a stamp pad over it to highlight the embossing and then punched a couple of holes at the top of the card front and ran a piece of ribbon through it to make a bow. Then, I stamped a red square of paper with white chalk ink and adhered it to the center. And finally, I stamped a valentine sentiment inside.

Happy day!

Trude