Sunday, August 31, 2014

Wondrous Wreath Card

Wondrous Wreath, Christmas card, Stamp with Trude, Stampin' Up!
Here's another way that the Wondrous Wreath can be colored. It is Pool Party and Silver with Coastal Cabana berries and bow. The snowman is from the White Christmas set.

There are many color combination possibilities with this wreath. I can see it being used for so many different occasions (spring, baby cards, Easter).

The background was difficult for me to photograph. It is silver foil paper and wants to flash back at me. I think I took this one without the flash so it wouldn't have bright spots.

Paper: Whisper White card stock, Pool Party card stock, Silver Foil paper
Ink: Silver Encore, Poot Party, Coastal Cabana
Stamps: Wondrous Wreath, White Christmas
Other: Stylish Stripes embossing folder, Wonderful Wreath framelits dies

I will be announcing the winner of the blog candy tomorrow (Monday, Sept.1) so stay tuned!
Please "Follow" my posts so that you don't miss future blog hops and the opportunity to win blog candy!

Happy Day!
Trude


Built for Free Using: My Stampin Blog

Friday, August 29, 2014

Holiday Home Halloween Card

Have you checked out the new Stampin' Up! Holiday catalog yet? So many wonderful stamps and products! You can click on the catalog tab above to view/download a pdf of the new catalog.

Did you miss my post yesterday? Happy Stampers had a Blog Hop that included Blog candy. There's still time to get in on the fun, check it out here.

Here's another project that I created with products from the new catalog.
http://stampwithtrude.blogspot.com/2014/08/new-stampin-up-holiday-catalog.html

The stamp set is called Holiday Home. It has houses and accessories for several holidays.
I used the Back to Black Designer Series Paper from the New Annual Catalog for the background paper on this piece. I used an aqua painter and ink to add Pumpkin Pie and Blackberry Bliss color washes to the DSP.
After you stamp the black paper with white craft ink and let it dry (very important!) you can use the new Stampin' Up! Blendabilities to color over any of the white that you want to add color to.

Have a crafty day!
Trude

Thursday, August 28, 2014

Happy Stamper's Holiday Catalog Blog Hop

Happy Stampers Stampin' Up! Holiday Catalog Blog Hop

 
Stampin' Up! Wonderous Wreath stamp set creation by Trude Thoman http://stampwithtrude.blogspot.com


 Hello!
Welcome to our Blog Hop, thanks for stopping by.

I have two fall projects (and a bonus) created with the Wondrous Wreath stamp set. I wanted to show you that this set is versatile. You can use it for more than Christmas projects. It just takes a little switching out of the colors.

In this case I chose to use the baby wipe technique because it allows me to add spots of color quickly without coloring in each individual leaf.  I like to make multiple cards at one time when I am using this technique so that I get the best use of my supplies.

Stampin' Up! Wonderous Wreath stamp set fall card by Trude Thoman http://stampwithtrude.blogspot.com

I stamped the kraft paper background with the acorn trio from the "For All Things" stamp set. I used VersaMark watermark ink.

For the banner I used the banner and sentiment from the "For All Things" stamp set. I used Hello Honey ink and stamped off once before stamping the banner onto Whisper White card stock. I used Rich Razzleberry ink for the sentiment, also for the ribbon and Rich Razzleberry card stock for the small pennant.The ribbon is 1/8" Crushed Curry Taffeta.

_______________________________________________________________________

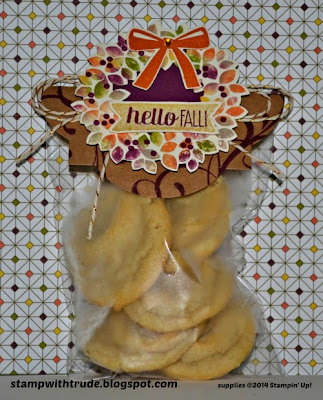
The second project is a bag topper. I used a cellophane bag, but the kraft paper bags in the catalog would be cute too! Do you like the foggy effect on the bag? That is what happens when the room temperature is over 90 degrees and the cookies come out of the freezer and straight into the bag! It's a frosty effect, just for fall ☺.
Stampin' Up! Wonderous Wreath stamp set fall treat bag topper by Trude Thoman http://stampwithtrude.blogspot.com

Stampin' Up! Wonderous Wreath stamp set fall treat bag topper by Trude Thoman http://stampwithtrude.blogspot.com

I used the Tangelo Twist ink for the ribbon on this wreath. I punched a circle of Rich Razzleberry card stock and attached it behind the wreath so that it would 'pop'. For this project I chose the gold Baker's twine as the ribbon. I attached it to a base created with Kraft paper and the Window Frames collection framelit which is stamped with Rich Razzleberry ink and the swirl stamp from Everything Eleanor.

________________________________________________________________________

For the bonus project I created a place card holder that is also a treat box.I used kraft paper, my pre-made wreath (remember, I stamped all the wreaths at once to get the most out of my supplies), and Hello Honey 3/8" Stitched Satin Ribbon.
It is quite easy and would really look cute on a Thanksgiving table next to each place setting.

Stampin' Up! Wonderous Wreath stamp set fall place card holder/ party favor by Trude Thoman http://stampwithtrude.blogspot.com

These are the products I used for both of these projects:

Kraft card stock #133674
Very Vanilla card stock #101650
Rich Razzleberry card stock #115316
Cellophane Bags #133770
Polka Dot Tag and Bag Gift Bags #135503 (cute alternative to the cellophane bags)
Gold Metallic Baker's Twine #132975
Hello Honey 3/8" stitched Satin ribbon #133671
Crushed Curry 1/8" Taffeta ribbon #134585
Everything Eleanor stamp set- wood #131987, clear #124164
For All Things stamp set- wood #135152, clear #135155
Wondrous Wreath stamp set and matching framelit bundle- #137624
Tangerine Tango reinker #111841
Hello Honey ink pad #133643
Tangelo Twist ink pad #133646
Rich Razzleberry ink pad #126950
Rich Razzleberry reinker #115664
Old Olive reinker #100531
Sahara Sand reinker #105220
VersaMark watermark ink pad #102283
Angled Tag Topper punch #133324
________________________________________________________________________ 

One of my lucky blog readers will receive this Library card journal that I made, a package of Baker's twine, and a stack of hand made designer paper envelopes.

Blog Hop Candy

Journal pages
____________________________________________________________


Click the blue arrow to return to Marian Anderson's blog.

www.handcraftingwithheather.comhttp://www.stampinup.net/esuite/home/craftingwithmarian/blog
                 
              Click the yellow arrow to go forward to Kristi Gray's blog.


List of blog hop participants:

Trude Thoman (that's me) -  http://stampwithtrude.blogspot.com/2014/08/happy-stampers-holiday-catalog-blog-hop.html
Kristi Gray –  www.stampingwithkristi.com
Sandi MacIver - www.stampingwithsandi.com
Amy Koenders –  www.stampwithamyk.com

Please 'follow' my blog. I share ideas regularly and sometimes even add some blog candy! If you follow my blog you won't miss it ☺

If you are looking for a Stampin' Up! demonstrator, I'm here to help you! 
Have a Happy Stamping Day!
Trude 

Built for Free Using: My Stampin Blog

Friday, August 22, 2014

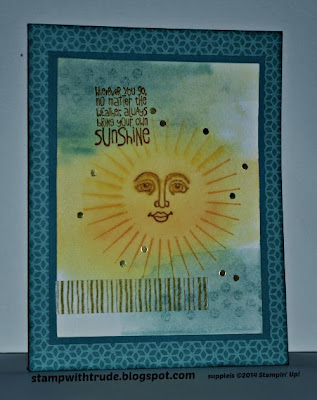
Kinda Eclectic Ray of Sunshine Greeting Card

Ray of Sunshine and Kinda Eclectic greeting card

c and Ray of Sunshine stamp sets http://stampwithtrude.blogspot.com
I love how this card turned out. The two Stampin' Up! stamp sets work well together. The sunburst from the Kinda Eclectic set is a quick alternative to stamping each ray, in the Ray of Sunshine set, individually.

I began by watercoloring the background with an aqua painter and ink picked up from the lids of the ink pads.Next I punched out a 1 1/4" circle from a sticky note pad and adhered it to the art piece where I wanted the sun. I stamped the dots border by stamping off the ink once before stamping on the art piece. Then I stamped the sunburst over the sticky note, removed the note and stamped the face. To complete the art piece I stamped the sentiment, added Washi tape and punched small dots from gold foil paper to adhere around the sun's rays.

To complete the card I adhere it to a piece of cardstock mat and mounted it onto the designer series paper.

Here are the products that I used on this card:
Watercolor paper #122959
Lost Lagoon card stock #133679
Flowerpot Designer Series Paper #133698
Very Vanilla card stock #101650
Gold Foil Paper #132622
Lost Lagoon Classic Stampin' Ink #133644
Crushed Curry Classic Stampin' Ink #131173
Aqua Painter #103954
Washi Tape133000
1/16" circle punch #134363
1 1/4" circle punch #119861
Ray of Sunshine- wood #134339, clear #134210
Kinda Eclectic- wood #135347, clear #135350
2-Way glue #100425
sticky note pad

Have you tried the aqua painter for your watercolor projects? It is the best way for beginners to get started with watercolor techniques. Seasoned painters love them too! I'd love to hear some comments from you.

If you are looking for a Stampin' Up! demonstrator I would love to help you.

Sunshine Greetings!
Trude

Wednesday, August 20, 2014

Something for Baby Card

Stampin' Up! Something for Baby baby card 

Stampin' Up! baby card, Something for baby stamp set, card created by Trude Thoman http://stampwithtrude.blogspot.com

This is a quick card. It should take under 10 minutes. Cut and fold a Whisper White card base. Adhere 4 1/4" x 5 1/2" chocolate chip card stock to the front. Cut a 3" x 5 1/2" Whisper White card stock piece and use an aqua painter to apply a stripe of Coastal Cabana ink (either use a drop of reinker or squish the lid on the ink pad and pick up the color from the inside of the lid).

Use the small grunge splatter stamp to stamp some splatter across the card. I think I may have stamped it off one time before stamping to decrease the intensity. Stamp the baby buggy with chocolate chip ink and the hello baby also.

Adhere to card front about 1/2" from top, there should be about 3/4" remaining at the bottom. Apply the Washi tape across the bottom and a strip above the buggy and you are done! Wasn't that easy?!

Thank you for joining me in my craft room today!
Happy Day, 
Trude

Mojo Monday Sketch Challenge 359

 Mojo Monday Sketch Challenge 359

Just a real quick post so that I can get this posted on Mojo Monday Sketch Challenge site.


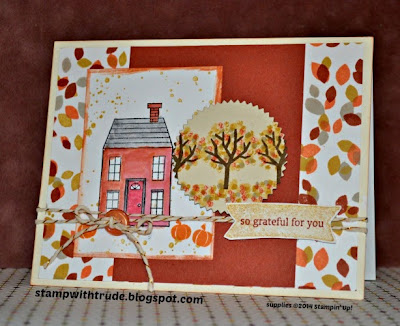
Stampin' Up! fall card created by Trude Thoman with the Holiday Home stamp set http://stampwithtrude.blogspot.com


http://mojomonday.blogspot.com/


I used the Gorgeous Grunge stamp set, the Wondrous Wreath stamp set and the For All Things stamp set. The first set is in the annual catalog and the last 2 are in the new holiday catalog.

I used Very Vanilla card stock for the bottom layer on the card front then I stamped the leaves on Whisper white card stock. I stamped the house with Jet Black Sazon and watercolored it with an aqua painter and ink. I stamped the trees and then colored the leaves in with cotton swabs.
 

 Happy Stamping!
Trude

Tuesday, August 19, 2014

Regarding Dahlias Greeting Card

Stampin' Up! Regarding Dahlias Greeting Card

Stampin' Up! Regarding Dahlias stamp set Greeting card by Trude Thoman http://stampwithtrude.blogspot.com

If you like shiny cards, this card is for you! There is shine all over it from the silver foil paper, to the rhinestones and Fancy Foil Vellum.

I used watercolor paper for the dahlia stamp. First I heat embossed the flower with Encore silver ink and silver embossing powder. Then I sprayed the dahlia with water in a Stampin' Spritzer until the water pooled up in each embossed petal. Then I sprayed it with Rich Razzleberry reinker mixed with rubbing alcohol in a Stampin' Spritzer. If the sprayer doesn't deposit enough color the first time, rewet the flower and spritz again...or use an aqua painter to touch some of the color on a few water filled petals. Let it dry real well and then cut it out, sorry, no framelits to cut it out so get the scissors out and do some fussy cutting.

Before you put the reinker filled spritzer away, cut a piece of the cotton ribbon, spritz it with the water and then with the color. Let dry.

I don't recommend using the heat tool to dry the dahlia because it changes the appearance of the embossed image, removes some of the shine.


Thanks for joining me in my craft room today. Enjoy the day!
Trude

Monday, August 18, 2014

Tea Party Thank You Card


Stampin' Up! Tea Party Thank You Card

Stampin' Up! Tea Party Thank You card by Trude Thoman  http://stampwithtrude.blogspot.com
I'm trying out some of the new paper from the New 2014 Annual Stampin' Up! catalog. This paper is called Lullaby. It does have nice colors for baby cards, but I like to see what else I can create with it besides the obvious.

Friday, August 8, 2014

Big News Birthday Card

This birthday card is created with the Big News Stampin' Up! stamp set. I like this stamp set because it has Big Bold greetings that make it easy to create very quick cute cards. I already shared one stamp with you from the set...the Happily Ever After stamp. The candle is in the same set, but the little scattered stars are in the Be the Star set.

To create the 'glow' around the 'flames' I used a sponge dauber to sponge circles of ink; then I used Dazzling Details to add some sparkle to the star flames. I also stamped a row of stars along the bottom of the inside of the card and then randomly stamped several candles across the border.

stampwithtrude.blogspot.com Stampin Up Big News birthday card

stampwithtrude.blogspot.com Stampin Up Big News birthday card

I like the way the card turned out and will probably do a stack of them to put in my birthday organizer. I can't seem to keep up with birthday cards. This one is so quick that it should help me get ahead a little.

That's it for today. Remember to check out yesterday's blog and enter a comment by Saturday night so you can have a chance to win the blog candy!

Happy Day!
Trude

Thursday, August 7, 2014

5th of 5 CASEd Stampin' Up! Cards and Blog Candy

Today is the last entry for my CASE Series. Don't worry, I will be sharing more Stampin' Up! cards with you almost every day.

This card is created with the Be the Star stamp set and the Gorgeous Grunge stamp set. Do you have Gorgeous Grunge yet? Have you used it much? I use it a lot! It really is such a useful stamp set. I would love to hear if you have used it, or if it is on your wish list. Sooo... I have a set of 3 stamps from the April 2013 Paper Pumpkin Kit that I am going to give away as blog candy when you tell me if you have the set and how much you use it. I will go to random.org on Sunday, August 10th to pick a random winner from the comments. The deadline for comments is Saturday, August 9th at 11:59 PM. I will post the winner after noon on Sunday.

http://stampwithtrude.blogspot.com stampin up masculine birthday card Be the Star stamp set Gorgeous Grunge stamp set On Film framelits
* Here's a hint about cutting out the On Film Framelit...put a piece of waxed paper between the die and the card stock. Your die cut will be easier to remove if you do!

Well, that's it for today. Please leave a comment! I would love to hear from you and be your Stampin' Up! contact if you don't have a demo already!

Happy Stamping,
Trude

Wednesday, August 6, 2014

4th of 5 CASEd Stampin' Up! Cards


If you have a wedding to attend and need a quick card, this is the one for you! It just takes some designer series paper, whisper white card stock, baker's twine, two stamps, ink and embossing powder.
Very easy, you can do it in 10 minutes if you are organized!

http://stampwithtrude.blogspot.com Stampin' Up! wedding card by Trude Thoman Big News stamp set
First cut your Whisper white card stock to 5 1/2" x 11". Then cut a piece of Lullaby Designer Series paper 5" x 5".

Use either VersaMark watermark ink or Gold Metallic Encore ink to stamp the sentiment. Emboss with Gold embossing powder and a heat tool. Stamp the heart on the opposite side of the sticky area of a sticky note. Cut the heart out. Stamp and emboss the left heart with the same ink and powder previously used. Cover the cooled heart with the sticky note mask. Stamp the second heart to the right and emboss with the gold E.P.

Cut a strip of chevron paper, from the Lullaby Designer Series Paper pack, into a banner; adhere to top left of stamped piece; adhere to the front of the folded Whisper White card.

Tie Baker's twine into a bow; adhere to right side of banner with a glue dot. Stamp coordinating greeting inside card. Sign, Seal, and Deliver!

This is the 4th card that I redesigned from the Stampin' Up! spring occasions catalog. Please come back tomorrow to see the final card.

Tuesday, August 5, 2014

3rd of 5 CASEd Stampin' Up! Cards

Hello,
Welcome back to my blog for the 3rd card in the series of Stampin' Up! CASEd cards.

Have you found all the cards, so far, in the Occasions catalog?

stampwithtrude.blogspot.com Gorgeous Grunge Stampin' Up! greeting card


I used a 5 1/2" x 4 1/4" folded Whisper White card stock base to build my card on, but it would look great using a Very Vanilla card base or the Naturals Ivory card stock for the base. I then layered a 5 1/2" x 4 1/4" piece of Hello Honey card stock onto the base.

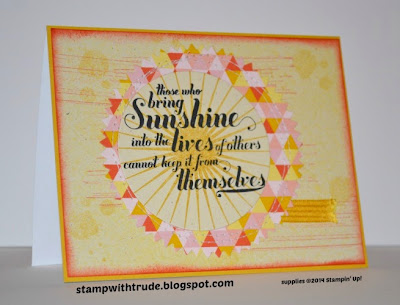
For the next layer I used Naturals Ivory card stock. I spritzed it with Delightful Daffodil reinker mixed with alcohol in a Stampin' Spritzer. You could use Hello Honey, I just used what I already had made up from a previous project. Then I used two different Gorgeous Grunge stamps. I stamped the medium size splatter several times with Hello Honey ink. Each time I stamped off once to remove some of the ink so it wouldn't be as intense when I stamped it on the paper. I then used the long stripe stamp with Tangerine Tango, also stamped off before stamping on the card. Then I sponged the edges with Tangerine Tango.

Next I used a Starburst framelit to cut a piece of Flowerpot Designer Series Paper. I adhered it to the Naturals Ivory card stock, tucking a piece of Hello Honey 3/8" stitched satin ribbon under the lower right corner, and used my sewing machine to stitch around the edges twice. Then I adhered the piece to the card base.

Then I used a sentiment from the Feel Goods stamp set and stamped with Jet Black Stazon ink onto a piece of Naturals Ivory card stock. After stamping the sentiment I used a circle framelit to cut it out (it just barely fits, so alignment is very precise). I used Hello Honey ink to stamp the sun rays from Kinda Eclectic stamp set, which I stamped off once first so that it wouldn't be as intense. I adhered the circle to the left side of the Sunburst background to complete the card.

That's it for today. I hope you are enjoying this series and will come back tomorrow to check out what I am up to!

Have a Wonderful Day!
Trude

Monday, August 4, 2014

2nd of 5 CASEd Stampin' Up! Cards

Welcome back to my series of CASEd cards.

CASE is a term used quite a bit by Shelli Gardner the co-founder of Stampin' Up! She encourages people to Copy And Share Everything. She doesn't necessarily mean that people should make identical copies of the cards that are in the Stampin' Up! catalogs, but she doesn't rule that out.

In this series I Copy the layout and switch out the paper, stamps, and ink.

Here's today's switch. Can you find the original in the Stampin' Up! Spring Occasions catalog?

stampwithtrude.blogspot.com Perfect Pennants stamp set Stampin' Up! card

I used Vanilla Naturals card stock as the base. Then I sponged hearts on it using the Decorative Hearts mask and Melon Mambo ink. I also sponged Melon Mambo ink around the outside edges of the card front.

The frame is a photo frame from the On Film framelit Big Shot die cutter set. I used Tempting Turquoise card stock.

The banner is die cut with the Banners framelit Big Shot die cutter set. I used Daffodil Delight card stock and stamped a sentiment from the Perfect Pennants set using Rich Razzleberry ink. I sponged Melon Mambo on the edges. Then I glued a strip of Sweet Taffy Designer Series paper to the top of the banner and cut 3 small banners from the same paper. I strung them all on a piece of white Baker's twine.
The heart is also from the Perfect Pennants stamp set. I stamped it with Melon Mambo ink and hand cut it. Then I cut a banner, with a Bitty Banner Framelit, from Rich Razzleberry card stock and stamped "friend" (from the Peachy Keen stamp set) on the heart. I layered the heart onto the Bitty Banner and adhered it to the card using Dimensionals.

Thanks for checking out my blog today. Please say HI! and come back to check out by blog tomorrow.

Have a Happy Stamping Day!
Trude

Sunday, August 3, 2014

1st of 5 CASEd Stampin' Up! Cards

Hello,
I hope you are enjoying your weekend. Thanks for stopping to look at my blog.
Today I am sharing a card that is the first of 5 that I have "copied and shared" CASEd from the 2014 Stampin' Up! spring Occasions catalog.

The idea of CASE is not necessarily to replicate the card, but some aspects may be the same. In the case of the cards that I CASEd and will be sharing the next 5 days I copied the layout, a design aspect of the card, but switched out the papers, inks and stamps.

Can you find the card in the spring Occasions catalog that I CASEd today?

stampwithtrude.blogspot.com Stampin' Up! card Chalk Talk stamp set

The base for this card is 5" x 5". On the front of the folded Whisper White card base I added a layer of red Designer Series paper. The Next layer is 4 3/4" x 4 3/4" and is spritzed with Real Red ink using a Stampin' Spritzer filled almost full of alcohol with 20 drops of Real Red reinker added.

Then I grabbed the new Decorative star mask and sponged some Hello Honey to add some stars to the spritzed background paper. Then I added 3 strips of Washi tape from the new Beach House set.

The Sentiment is from the Chalk Talk stamp set and I stamped it with Real Red ink and then die cut it with the matching framelit.

Thanks for stopping by. I would love to hear your comments.
Please drop by tomorrow to see the next card I CASEd
Have a Lovely day, 

Trude

Friday, August 1, 2014

Patriotic Banner

I finally finished this patriotic banner that I was going to hang up for the month of July. I guess I will have to wait until next year. I started it before I left for vacation, but didn't get it all done.

4th of July, Memorial Day, Flag Day, Veteran's Day

The Rosettes were made from retired Stampin' Up! Designer Series Paper. You can use the Brights Designer Series Paper stack instead. The banners were made with the Build a Banner Simply Created Kit.

The banners are real easy to make with the kit. The kit includes the stencils for the dots, lines, zigzags and letters. The kit also comes with 3 different banner shapes (6 each for a total of 18) and the twine to string them on.

The last time I used the kit was for a Christmas banner and I used the Stampin' Spritzers. They worked okay, but were a bit messy. I decided to try using the Stampin' Sponges to sponge on the ink this time and I think it worked just as well or better.

The huge rosettes are a bit tricky. I tried using some hot glue to hold them together. I punched a 2 1/2" circle and applied the glue to the circle, then tried to place it on the back of the rosette. Finally I tried using some Scotch quick dry tacky glue and my heat tool to warm it up, just a little, and then when it was set and not moving I applied hot glue under the circles where it met each ridge. What I really wished that I had available was the Jumbo Sticky Rounds from Stampin' Up! I could have just slapped it onto the back of the punched circle and then onto the rosette and voila' instant success! I am going to have to get some in my next order!

On the fronts of the rosettes I glued red and silver glimmer paper stars. I cut the stars with the new framelits.
Thanks for stopping by and checking it out!
Trude