Friday, July 31, 2015

Journal It! # 104

Journal It! 104

Here's a journal prompt for you to consider...

What was your first 'crush' like?
Write the prompt in your journal and Journal It!

Groovy Love stamp set

Thursday, July 30, 2015

Throwback Thursday # 8

It's Thursday again and time for another visit with the past, Stampin' Up! retired products that is.

This set is called Noteworthy and it was a hostess set (dated 2006). 

Noteworthy stamp set, Stampin' Up!, http://stampwithtrude.blogspot.com, Trude Thoman, valentine card, love, Throwback Thursday

Retired products I used:
Cherry Cobbler textured card stock
Stacked with Love Designer series paper
More Amore' heart
Real Red 1/8" taffeta ribbon
Noteworthy stamp set

Current products I used:
Whisper White card stock
Rose Red ink
Cherry Cobbler ink
Glue dot
Dimensionals

The Cherry Cobbler card base is 4" x 4". 

Groovy Love
Groovy Love stamp set is in the current catalog and includes decorated hearts and sentiments that fit in the Bitty Banner Framelits.

Bitty Banner Framelits


Wednesday, July 29, 2015

Wednesday 101 - Rubber Stamping- The Basics

One of the first things people usually want to know about paper crafting and card making is, what tools they need to start.

Really there aren't many tools that you need to have when you first begin, but there are many tools that you will probably want to get sooner or later.


Here are my basic go-to tools:


Scissors- I like small ones with a Teflon coating but they aren't easy to find. Here's a nice pair that Stampin' Up! sells.

Paper Snips


Bone Folder- For creating perfect creases on your cards. 

Bone Folder

A Glue Stick- I like the one that Stampin' Up! sells because it has square corners and gets in the corners easily.
Glue stick

2-Way Glue Pen- For attaching strips and small pieces of paper and glitter.
2-Way Glue Pen

Snail Tape- adhesive transfer tape that sticks layers of paper together oh so nicely!
Snail Tape

Double sided tape- love it for heavy duty sticking and also great for glitter application.

Tear and Tape


 I also keep a pencil, eraser and small 6 inch ruler close by. In addition to those items I also keep a pencil box handy to organize them and make them easily transportable. And that is pretty much the basics!


Journal It! # 103

Journal It! 103

The prompt of the day:

As an adult, what has been your favorite vacation? Tell about it.

Write the prompt in your journal and Journal It!

Click here to see Stampin' Up!s travel stamps


Tuesday, July 28, 2015

Tuesday Tutorial # 7

Today's Tuesday Tutorial is about making your own embellishments. 

Sometimes you just need a little something and you don't have the right color... 

 This tutorial will give you some ideas download it now!


Monday, July 27, 2015

Journal It! # 102

Journal It! 102

Journal prompt for this day-

To what country, that you have never traveled to, do you most wish to go?

Write the prompt in your journal and Journal It!


Sunday, July 26, 2015

Scrapbook Sunday # 7

For this scrapbook page I created my own project life cards to insert in the pockets. I used the Project Life grid cards. When I finished the top card I cut it in half to fit into the 2 smaller pockets.


The card in the lower corner will be used for journaling.

I used the Sea Street stamp set to decorate the cards. The inks I used: Calypso Coral, Pacific Point, and Crumb Cake.

Saturday, July 25, 2015

Journal It! 101

Journal It 101

What do you think about this?...

What would you do if you became a multimillionaire over night?

Write the prompt in your journal and Journal It!

Here's another one that I'm having a difficult time recommending a stamp set for. There are some travel stamps, or maybe the stamp set that I recommended a couple of days ago?

Here's a link to the travel stamps that Stampin' Up! carries.


Check out the new Hostess Code Gift offer

Friday, July 24, 2015

Journal It! # 100

Journal It 100

Here's a great prompt to write about!

If you are a grandparent write about your grandchildren. 

If you are not a grandparent tell how you feel about becoming a gradparent in the future.

Write the appropriate prompt in your journal and Journal It!

You could also add a photo of your grandchild or use these stamps to represent a present or future grandchild.

Hey Girl stamp set

Skating By stamp set


Thursday, July 23, 2015

Throwback Thursday # 7

This Throwback Thursday card is created with a Stampin' Up! stamp set from 2001 called "Thank You Blocks".

Thank You Blocks, Stampin' Up!, Trude Thoman, http://stampwithtrude.blogspot.com , Thank You card, Throwback Thursday

Retired product that I used on this card are Whisper White Thick Baker's twine, Champagne glimmer paper and the thank you stamp.
Other supplies:
Blushing Bride card stock, Vellum,  Blushing Bride reinker to dye the twine, White craft ink to emboss the sentiment, 1/8" and 1/4" circle punches, English Garden Designer Series Paper


Wednesday, July 22, 2015

Wednesday 101- Rubber Stamping- The Basics

Today I'm going to talk about cleaning your stamps.

When you stamp with a stamp, the best time to clean it is right away. Stamps that are cleaned and stored properly will last many years.

One of the easiest ways to clean stamps is to use a cleaning pad that sits right on your work station. Stampin' Up has an extra large one that accomodates almost every size of stamp. It has a fuzzy surface that gently cleans the ink off the stamp.

Stampin' Scrub
One side is for cleaning and one side is for drying. Use with Stampin' Mist cleaner.

I do not use the same Stampin' Scrub to remove solvent inks (Stazon) and dye inks (Classic Stampin' Inks). I use one for each. They each have a different cleaning solution.

Here are some suggestions for cleaning your stamps if you do not have a scrub pad like the one pictured.

Most inks will be removed easily in water. Just hold them under running water then dry with a paper towel. Allow to completely dry before storing. 

Another way that doesn't soak the wood handled stamps is to fold paper towels into a pad and place on a plate. Wet with water and stamp the stamp into the dampened paper towels until ink is removed.

Another method is to use baby wipes. It works quite well to get a tub just for cleaning your stamps. Open the lid, stamp the stamp on the top wipe until the stamp is clean. Use only baby wipes without alcohol and ones that are lint free. Alcohol may dry out the stamps and lint will leave fuzz on your stamps.

For Craft and Pigment inks you may have to use a soft toothbrush with some liquid soap. Joy dish soap is pretty good. Dawn may be too harsh on rubber stamps. 

To properly clean solvent inks you need a special cleaner. Stampin' Up! sells Stazon cleaner as well as dye ink cleaners. If the stamp is still stained by the solvent ink after cleaning, don't stress about it. The solvent inks are permanent and will not transfer color the next time they are used.

I hope that you learned something today!
Have a blessed day,
Trude 

Journal It! # 99

Journal It 99

Your next journal prompt:

What have you always dreamed of owning? Describe it.

Write the prompt in your journal and Journal It!
_________________________________________________

Well, I'm not sure what stamp set to suggest for this prompt. How about this one? Especially the stamp that says, "The best things in life aren't things."
Feel Goods stamp set

Tuesday, July 21, 2015

Tuesday Tutorial # 6

Have you tried water coloring with Aqua Painters? Well, here's your chance to give it a try.

I admit I'm not an expert, but I keep working with it and one of these days I will succeed!

You've Got this, stampwithtrude.blogspot.com, Trude Thoman, Stampin' Up!, sympathy card, encouragement card, watercolor, Tuesday Tutorial


The tutorial includes a supply list, photos and instructions.

 I love your feedback! Please leave a comment.

Have a blessed day,
Trude

Monday, July 20, 2015

Journal It! # 98

Journal It! 98

The journal prompt of the day is-

List all the states you've been to.

Write the prompt in your journal and Journal It!

Here's a cute stamp set that would work with this journal entry-

Map It Out stamp set

Sunday, July 19, 2015

Scrapbook Sunday # 6

I created a two page layout today. I CASEd a layout by Lisa Curcio. Some of the new Designer Series Paper arrived at my door so I wanted to use it to create a scrapbook page.

Scrapbook Sunday 6, Trude Thoman, stampwithtrude.blogspot.com, Stampin' Up!, English Garden Designer Series Paper, scrapbook, two page layout
The background is 12" x 12" Very Vanilla for both pages. I used Soft Suede and Pool Party for the accent colors and the papers for the tags come from the English Garden Designer Series Paper pack.

Other products
2" circle punch
Chevron border punch
Mini Treat bag thinlits (washi tape)
Ornate Tag Topper punch
Old Olive Baker's twine

The tag in the upper left corner can be used for the title or for journaling.
 
Have a blessed day,
Trude 


Saturday, July 18, 2015

Journal It! # 97

Journal It! 97

Journal Prompt for the day,

What was your mother's occupation and how did you feel about it?

Write the prompt in your journal and Journal It!

Cottage Greetings
Thank you for checking out my blog today. If you will leave a comment on one of the posts on my blog and send me an email with "Happy Mail" in the subject line, I will send you some "Happy Mail". It's usually a hand stamped card, but may contain other happy additions.

Have a blessed day!
Trude

Friday, July 17, 2015

Journal It! # 96

Journal It 96

Here's the next journal prompt-

As a child, did you have a favorite book? Tell about it.

Write the prompt in your journal and Journal It!

Hey Girl


Thursday, July 16, 2015

Throwback Thursday # 6

This week I created a card with a retired shell stamp set. I like the ocean, shells, nautical themes and the last couple of days I would have loved to have been on a beach. One of these days, soon, I will have to go for a visit. I'm glad that I live within a couple of hours of the Oregon Coast. It is a beautiful coast to visit.

stampwithtrude.blogspot.com , Stampin' Up!, stipple shells birthday card, Throwback Thursday, refuge and strength stamp set

stampwithtrude.blogspot.com , Stampin' Up!, stipple shells birthday card, Throwback Thursday, refuge and strength stamp set
The bottom photo was intended for you to be able to see the sponging and verse inside, but my camera focused on the open flap instead of the background. However it does focus attention on the pearl detail!

Retired Products
Stipple Shell stamp set
Refuge and Strength stamp set

Current Products
Remembering Your Birthday stamp set
Awesomely Artistic Stamp set (background dots)
Soft Sky ink
Pool Party ink
Sahara Sand ink
Crumb Cake ink
Whisper White card stock
Stampin' Sponges
Pearls basic jewels
Corner Rounder

Here's a current stamp set that contains a shell.

By the Tide


Wednesday, July 15, 2015

Wednesday 101- Rubber Stamping- The Basics

This week's topic is a continuation of last week's topic. Last week we discussed the different types of ink and examples of each. This week we are going to talk about storage and maintenance of your ink pads.

For ink pads as with stamps, and probably even more critical, proper storage is important. Ink pads should be stored in cool dry places away from heat sources.

The general recommendation is that pigment, resist, craft and embossing pads should be stored upright as the ink is thicker and doesn't tend to migrate toward the bottom of the pads, but will sit too thickly on the surface if stored upside down. And for dye ink and solvent ink the pads should be stored upside down to keep the ink on the surface of the pad. Stampin' Up!s flip top case design automatically stores pads upside down.

To extend the life of your ink pads you should always try to purchase an in refill when you purchase a stamp pad. Stampin' Up! sells ink refills for every ink pad they sell.

Many people who create with rubber stamps have felt top ink pads and have learned to bang and twist the stamps on the ink pads when they are inking the stamp for use. Usually you do not need to bang and twist. If you find yourself banging the stamp on the pad to get it fully inked this can be an indication that the pad is dry and needs to have more ink added from the refill bottles
.

With foam pads, including Stampin' Up!s dense foam pads, it is best to tap the ink pad on the stamp rather that tapping the stamp on the pad. This allows for better visibility of the surface that is being inked and also allows greater control of the pressure when inking the stamp. One very important thing to remember when using a foam pad to ink the stamp is Never Twist The Stamp On The Pad!!! I can't emphasize this too much because twisting a stamp on the surface of the foam pad as you ink it will destroy your pad, it cannot be repaired. I have witnessed the destruction of ink pads from this method of inking.

Adding ink to a pad is easy. Use zigzag movement horizontally from top to bottom of pad lightly squeezing ink as you go. Then repeat the zigzag vertically from left to right. When you have completed the zigzags in both directions you can use the bottle tip to go over the pad lightly with small circles to encourage the ink to go into the pads. That's all there is to it!

bottles of ink to refill pads
 

Tuesday, July 14, 2015

Tuesday Tutorial # 5

Here's one of the New In-Colors that I love! It is Watermelon Wonder.
Have you ever seen a red work quilt? If you're a quilter you probably know what I'm talking about. Well this card is pieced similar to a quilt I made a few years ago. I also ran it through an embossing folder so it looks like it has been quilted.

Perfect Pennants, Stampin Up, Trude Thoman, http://stampwithtrude.blogspot.com , Tuesday Tutorial, greeting card
This is my Tuesday Tutorial card and I have all the supplies and instructions ready for you. This is how you get them...


I will send you the Tuesday Tutorial by email if you will send me your email address requesting to be added to my Tuesday Tutorial list (please send it to me privately to the email listed in my contacts and put in the subject line "add me to TT list"). This list will ONLY be used to send out the TT each week, it will not be used for marketing in any manner whatsoever.

Or, come back each week and download the Tutorial Here!


This is the Stampin' Up! stamp set that I used for this Tuesday Tutorial Quilt card


Perfect Pennants

Monday, July 13, 2015

Journal It! # 95

Journal It! 95

The next journal prompt for you to consider is...


Do you have a fear of any type of animal? Tell about it.

Write the prompt in your journal and Journal It!

Stampin' Up! Sets that you could use to decorate your Journal It! prompt

Zoo Babies

Hot Diggity Dog

Sunday, July 12, 2015

Scrapbook Sunday # 5

This week I made another Stampin' Up! Project Life scrapbook page. I'm having fun making them with the new card, stamp and embellishment sets that I got. I just received the "Let's Go" bundle. So many of my photos are road trip photos that I had to get that one first.

The letters are from the embellishment kit and the 2 stamps in the box on the card in the lower right pocket are from the coordinating stamp set. All the cards are from the coordinating card set.

I like to take vertical photos and my husband likes to take horizontal photos. I think both of them turned out great. The problem I had was that the original set of photo pocket pages from Project Life Stampin' Up! only held either horizontal or vertical, not both on the same page. But, hooray!, the second set of pocket pages that are in the new catalog had just what I needed, a page with both vertical and horizontal pockets on the same page!

Stamp With Trude Scrapbook Sunday
I haven't completed the journaling on this page yet, that's what the blank card at the top is for. The title is Gorge-ous Day because these photos were taken on a beautiful day in the Colombia River Gorge. The view from Crown Point is fantastic!

This is the Stampin' Up! Project Life set that I used for the scrapbook page

Let's Get Away Bundle

Saturday, July 11, 2015

Journal It! # 94

Journal It! 94

The prompt for today,


How did your parent's meet?

Write the prompt in your journal and Journal It!

Stamp sets for decorating your journal-

Groovy Love stamp set
Timeless Love stamp set

Friday, July 10, 2015

Journal It! # 93

Journal It! 93

Another day, another prompt!


Has there been a pastor or Bible teacher that made a big impact on your life? Who were they and what did they do?

Write the prompt in your journal and Journal It!

Then decorated the journal page.
Blessed by God stamp set

Thursday, July 9, 2015

Throwback Thursday # 5

For this week's Throwback Thursday I chose the Nature's Secret stamp set from Stampin' Up! 2005.
I decided that I would combine it with one of their brand new stamp sets, Watercolor Wings.


Watercolor Wings, Nature's Secret, #stampinup, Trude Thoman, Throwback Thursday, greeting card
I created the card base (background) with the Watercolor Wings stamp set. It is a new stamp set that is really wonderful because each part of the butterfly is stamped separately. Yes, it takes a few minutes more, but it allows for limitless interpretations of color combinations. There are 5 parts to a basic butterfly. I only stamped in 2 colors but if I had used 5 colors you would have been able to see all the separate parts.

The background fill-dots are also a part of the Watercolor wings set. You can use them for added detail on the butterflies or as I used them here, as part of the background.

The butterfly in the square is from the Nature's secret set, as is the sentiment. I used one of the smaller butterfly stamps from the new set to add color to the butterfly in the old set.

The sentiment is stamped in Elegant Eggplant on vellum and then embossed with clear embossing powder but it probably would have been more readable if I had stamped it in Jet Black Stazon and skipped the embossing. With the Elegant Eggplant ink it had to be embossed to keep it from smearing.

I used Pink Pirouette ink, Wisteria Wonder ink, Elegant Eggplant ink, Whisper White card stock, Wisteria Wonder card stock, Elegant Eggplant card stock, clear embossing powder, Vellum, Nature's Secret stamp set, Watercolor Wings stamp set

Watercolor Wings
Thanks for checking out my blog today!
Trude

Wednesday, July 8, 2015

Wednesday 101- Rubber Stamping- The Basics

Hello,
Welcome back to Wednesday 101- The Basics. Today we are going to look at another very important element of rubber stamping...Ink pads.

 There are quite a few types of inks and I'm sure I won't cover every one in this blog post, but I will get to the main ones and a couple extra.

 Each stamp pad fits into a particular category; Dye-based ink, Pigment ink, embossing/resist ink, craft/fabric ink or solvent (permanent) inks.

Dye-Based inks are water based and not as permanent as other inks. In fact some of these inks are created specifically so they will wash out and suggested for children's use. Traditionally felt pads were always used with dye-based inks, however some companies, Stampin' Up! for example, have switched to dense foam pads in their Classic Stampin ink pads. Dense foam pads are known for their ability to create sharp stamped images. This type of ink comes in the widest range of colors, they dry quickly and work well on vellum, matt and glossy papers. Dye inks are not recommended for use with heat embossing as they dry too quickly to hold the powder in place until it can be melted with a heat tool.

Pigment inks are thick, don't come in quite the color range as dye inks and are most often found with foam pads. Traditionally these types of inks took a long time to dry, and still most pigment inks have a longer drying time. But some pigment inks are now formulated to have a quicker drying time. Most fast drying pigment inks will have that noted on the label, so check the label when you buy pigment inks so that you purchase the one that is suitable for your purpose. Because of the slow drying time pigment inks are an excellent choice for heat embossing as they will hold onto the embossing powder long enough to be melted by the heat tool. When you use pigment ink on glossy paper it MUST be embossed as it will not dry, or soak into a glossy surface (the exception is Brilliance inks which we will talk about later).

Embossing/resist Inks are thick, slow drying inks that are formulated especially for embossing with opaque and metallic embossing powders and as a resist on glossy paper. They come in foam pads and are either clear or lightly tinted. Resist ink can be used to achieve a tone-on-tone effect. The ink pad that Stampin' Up! sells in this category is VersaMark watermark ink.

Craft/Fabric inks are usually formulated for use on fabric, however some are multipurpose and can be used on fabric, paper, wood, acetate, glass, metal and shrink plastic. Craft/Fabric ink needs to be heat set to become permanent in fabrics. Heat setting is also recommended on wood. Craft/Fabric ink is a type of pigment ink and is slow drying. Plenty of drying time should be allowed on nonporous surfaces. Stampin' Up! sells Whisper White craft ink, which can also be used to create chalk effects on dark papers and as an embossing ink.

Solvent/permanent inks are available in water-based and solvent based forms. They are quick drying and require special cleaners to remove from surfaces (in other words, not the best choice for children). This type of ink can be used on almost any surface. The water-based type ink pad is good for use with alcohol-based colored markers and the solvent-base pads work the best with water-based markers. Stampin' Up! carries both types of ink pads; solvent- Jet Black Stazon, and water-based- Memento Tuxedo Black.

Here are examples of the various types of inks
Classic Stampin' pad

Stampin' Up!s Classic pad is dye based, quick drying, comes in 46 colors. It is non-permanent and works great on matte, vellum, and glossy card stocks and papers.The ink is translucent and is in a thick raised foam pad. When closed the pad is upside down in the case so that the ink stays on the surface of the pad. The ink is acid free.
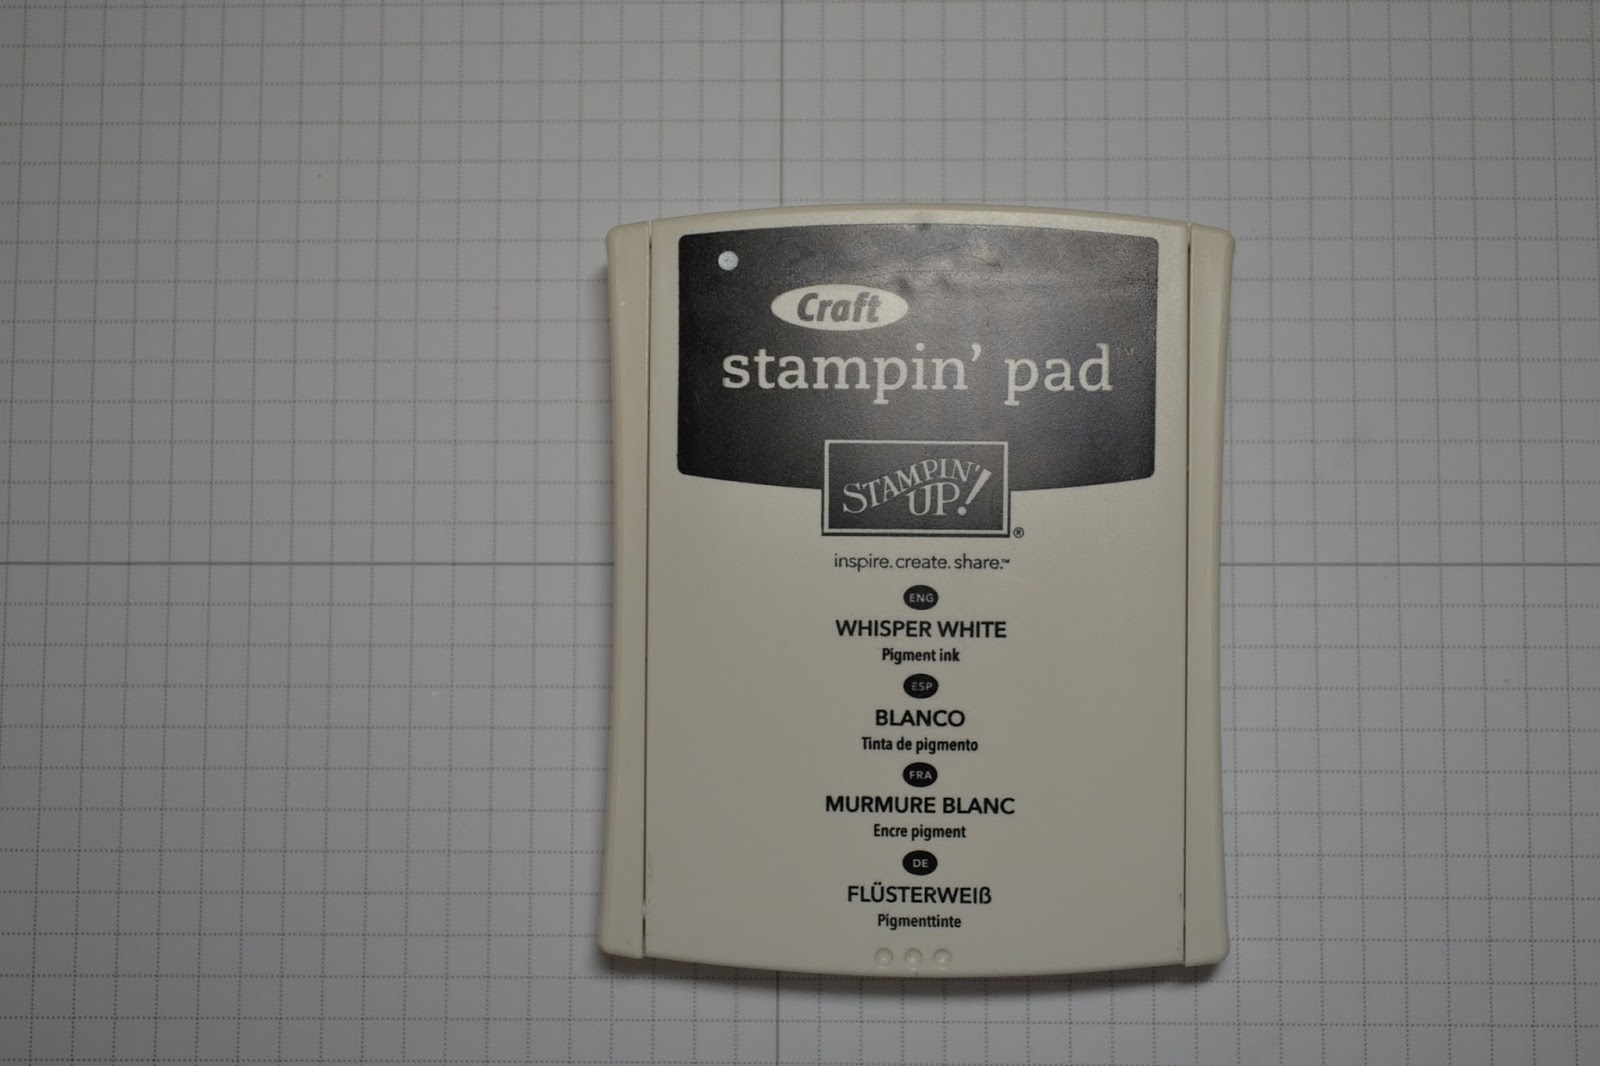


Craft Stampin' pad

Stampin' Up's Craft pad is pigment based, slow drying, and comes in Whisper White. The pad is made of foam. It works on most surfaces and is permanent when heat embossed. The ink is acid free.


VersaMark Watermark stamp pad

Stampin' Up! sells VersaMark watermark ink pads by Tsukineko. It is a resist ink pad that is slow drying and non permanent. The pad is made of foam. It works best on matte card stock and paper or on glossy paper as a resist. Use to create tone-on-tone background designs. This ink can be used as an embossing ink with embossing powder and a heat tool and is acid free.


Stazon Solvent ink pad

Stampin' Up! sells Stazon Solvent ink pads by Tsukineko. It is a permanent solvent-based ink that is fast drying and permanent. The pad is felt. It works well on most surface although it is not recommended for fabrics. This is the ink to use when coloring with water-based markers as it resists bleeding. Use this pad in a well ventilated area. This ink is acid free.


Memento Permanent ink

Stampin' Up! sells Memento ink pads by Tsukineko. It is permanent and fade resistant. It is quick drying and the pad is felt. It works on matte, glossy and vellum card stocks and papers. This ink resists bleeding and is great to use with alcohol based markers. This ink is acid free.


Brilliance ink pad
Remember I said we would talk about Brilliance ink pads? Well, they are not available through Stampin' Up! at this time, but they are one of my favorite inks. They used to be in every craft store and were available in many colors. Now the selections are very limited in stores, but I believe they can still be purchased online. I like these inks because they are what I call an all-purpose ink. They are pigment inks that dry fairly quickly and don't usually require heat setting. But they can also be used for embossing! The pads are foam and the ink is fade resistant, 
acid free and child-safe and can be used on almost
 any surface including photos and vellum. This is
                                                                                       also a Tsukineko product.


Color Box Fluid Chalk ink

This ink is not available through Stampin' Up! at this time, although it was available earlier this year in the Occasions catalog.
Chalk ink is a pigment ink that dries quickly and is permanent when heat set. The ink pads come in various sizes and colors. This ink has an opaque matte finish when dry and works well on dark papers for chalkboard effects. This ink is a product of Clear Snap.


I hope you've enjoyed this short tour of various inks that are available. There are so many more, but these are the ones that I use most often.

Have a blessed day,
Trude


Tuesday, July 7, 2015

Tuesday Tutorial # 4

I don't need as many children's birthday cards as I used to. Children have a way of growing into teens and then adults! Occasionally I still need a card that would be appropriate for an elementary age child so today that is the card that I created.

stamp with trude, http://stampwithtrude.blogspot.com, Trude Thoman, Tuesday Tutorial, Stampin' Up!, Boys Will Be Boys stamp set, child's birthday card, stencil technique, masking technique, emboss resist technique
I used the new Color Me Irresistible Designer Series Paper on this card. I also used the techniques of masking and stenciling. If you would like the list of supplies and the instructions for this card please do the following;

I will send you the Tuesday Tutorial by email if you will send me your email address requesting to be added to my Tuesday Tutorial list (please send it to me privately to the email listed in my contacts and put in the subject line "add me to TT list"). This list will ONLY be used to send out the TT each week, it will not be used for marketing in any manner whatsoever.

Have a blessed day!
Trude

Monday, July 6, 2015

Journal It! # 92

Journal It! 92

Here's a prompt for you...

What Christmas traditions do you enjoy today?

Write the prompt in your journal and Journal It!

Stamp sets to enhance your journal entry:

Lots of Joy
Gentle Peace stamp set